Custom Reports
With Structure, you can easily create a visual overview of your projects – and visualize all the data you need to track on a single screen.Step 1: Build Your StructureTo create a new structure:Go to the Jira menu and select Structure | Create StructureAdd the issues you want to track – you can add them manually or automatically using Automation | InsertAdd related issues - you can do this using Automation | Group and Automation | ExtendStep 2: Add DataNext, add the data you need to track by clicking the + button at the top-right corner of the structure. You can add as many columns as you need, including:Jira fields, such as status, assignee, sprint, or remaining estimateProgress - track status based on issue progress, percent completion, or resolutionTempo Work Logged - track how long your team is spending on each issueFormulas - create your own formulas to compare fields or create a visual reportTime in Status - see how much time issues spend in a particular statusLast Comment - view the latest comment for each issueOnce you've added your columns, you can aggregate the data up the structure. To do so, open the column you want to aggregate and select Sum over sub-items.Looking to visualize your structure data as a chart or other report? Our integration with Custom Charts for Jira makes it easy to build customizable charts from your structure data. Learn more
Manage Epics and Tasks
With Structure, you can easily organize issues into an advanced Agile hierarchy (Epics > Issues > Sub-tasks) AND identify any issues that aren't attached to epics.Step 1: Create a New StructureGo to the Jira menu and select Structure | Create StructureOn the Template page, select Empty StructureStep 2: Add Two FoldersOpen the +Add menu and select Folder. Add two folders, named:"Agile Hierarchy""Issues without Epics"Step 3: Insert EpicsSelect the Agile Hierarchy folder, so that its row is highlighted, and add a JQL Query Insert Generator:Go to Automation | Insert | JQL QueryEnter the following JQL query: issuetype = EpicTo limit the epics to specific projects or other variables, add additional specifications (Example: AND project = "My Epics")Click CreateAll your epics should now be placed beneath the Agile Hierarchy folder.
If the epics did not appear beneath the Agile Hierarchy folder, your generator was probably placed at the top of the structure, instead of beneath the folder. Select the "Insert issues: issuetype = Epic" row and drag it to beneath the Agile Hierarchy folder (see the picture above).Step 4: Insert Issues and Sub-tasksMake sure the Agile Hierarchy folder is still selected, return to the Automation menu, and add the following two generators:Extend | Stories under Epics...Extend | Sub-tasks...Step 5: Insert Issues without EpicsNext, we need to make sure we don't lose track of any issues that aren't linked to epics yet. That's what our second folder is for:Select the "Issues without Epics" folderGo to Automation | Insert | JQL QueryEnter the following JQL query: issuetype != Epic AND issuetype in standardIssueTypes() AND "Epic Link" is emptyIf you narrowed your query to specific projects, etc. for your epics, do the same hereClick CreateAny issues that are not assigned to epics should now appear beneath the second folder.If no issues appear under the Issues without Epics folder, make sure the Insert Generator is located in the right location - if not, drag the generator to beneath the Issues without Epics folder (see the picture above).Step 6: Assign Issues to Epics / Reassign IssuesNow that you have all your issues organized and in one place, you can assign issues from the second folder to epics, or even reassign issues that already have epics.Assigning Issues to EpicsTo assign issues in the second folder to an epic:Drag the issues to the epic you want to assigned them to.While dragging, hold down the ctrl key - this copies the issue to the new location in the structure. Once the issue is copied to the new location, it should disappear from beneath the second folder (because now it's assigned to an epic). Don't worry: copying an item in Structure does not make a copy in Jira.Reassigning Issues to New EpicsTo reassign issues from one epic to another, simply drag them from beneath their current epic to the new epic.
Release Management
With Structure, you can track all the issues for upcoming releases – even if they're from different projects – and visualize all the data you need to track on a single screen.Step 1: Build a Release Management StructureTo create a structure for release management: Go to the Jira menu and select Structure | Create StructureAdd the issues you want to track – you can add them manually or automatically using Automation | InsertGroup issues by fix version: Automation | Group | type "Fix Version/s" (Tip: If you use the same names in different projects, use "Version name..." instead.)Open the Summary settings and select Show Sprint and Version attributesStep 2: Add DataNext, add the data you need to track by clicking the + button at the top-right corner of the structure. You can add as many columns as you need, including:Jira fields, such as status, assignee, sprint, or remaining estimateProgress - track status based on issue progress, percent completion, or resolutionTempo Work Logged - track how long your team is spending on each issueFormulas - create your own formulas to compare fields or create a visual reportTime in Status - see how much time issues spend in a particular statusLast Comment - view the latest comment for each issueOnce you've added your columns, you can aggregate the data up the structure. To do so, open the column you want to aggregate and select Sum over sub-items.Looking to manage resources for your next project? Planner makes it easy to plan resources and capacity for your team.
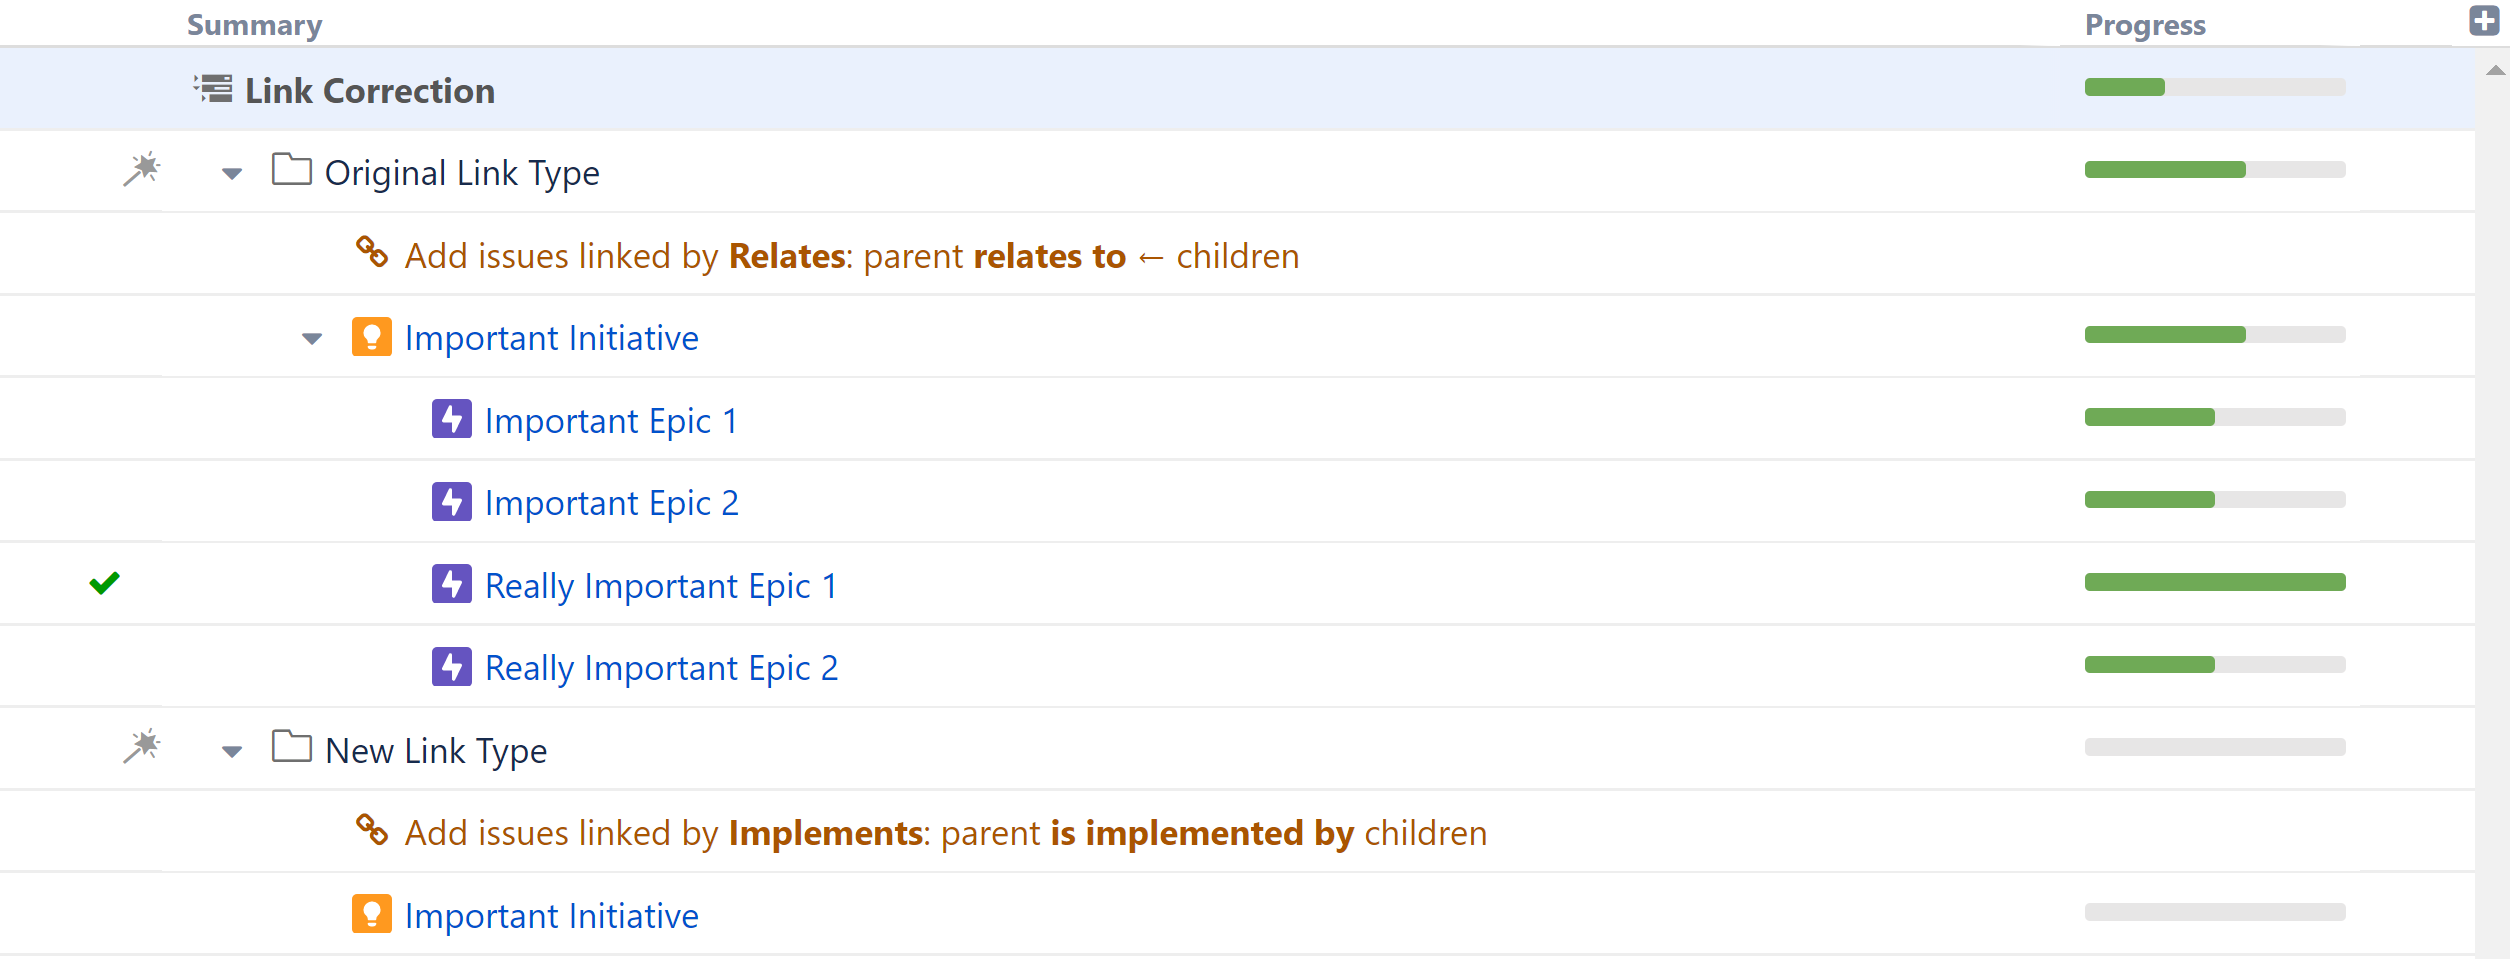
Synchronize Links Across Teams or Projects
When you're working across multiple projects and teams, chances are there are some inconsistencies between the link types being used. The following guide will show you how to quickly update all your links to a single, consistent link type using Structure.The examples below demonstrate how to update link types for an initiative, but the same process can be used for other link types as well.Step 1: Build a Simple StructureCreate a new, blank structure and add 2 folders: "Original Link Type" and "New Link Type". Manually add your parent initiative to both folders. Note: this should be the same initiative for both.
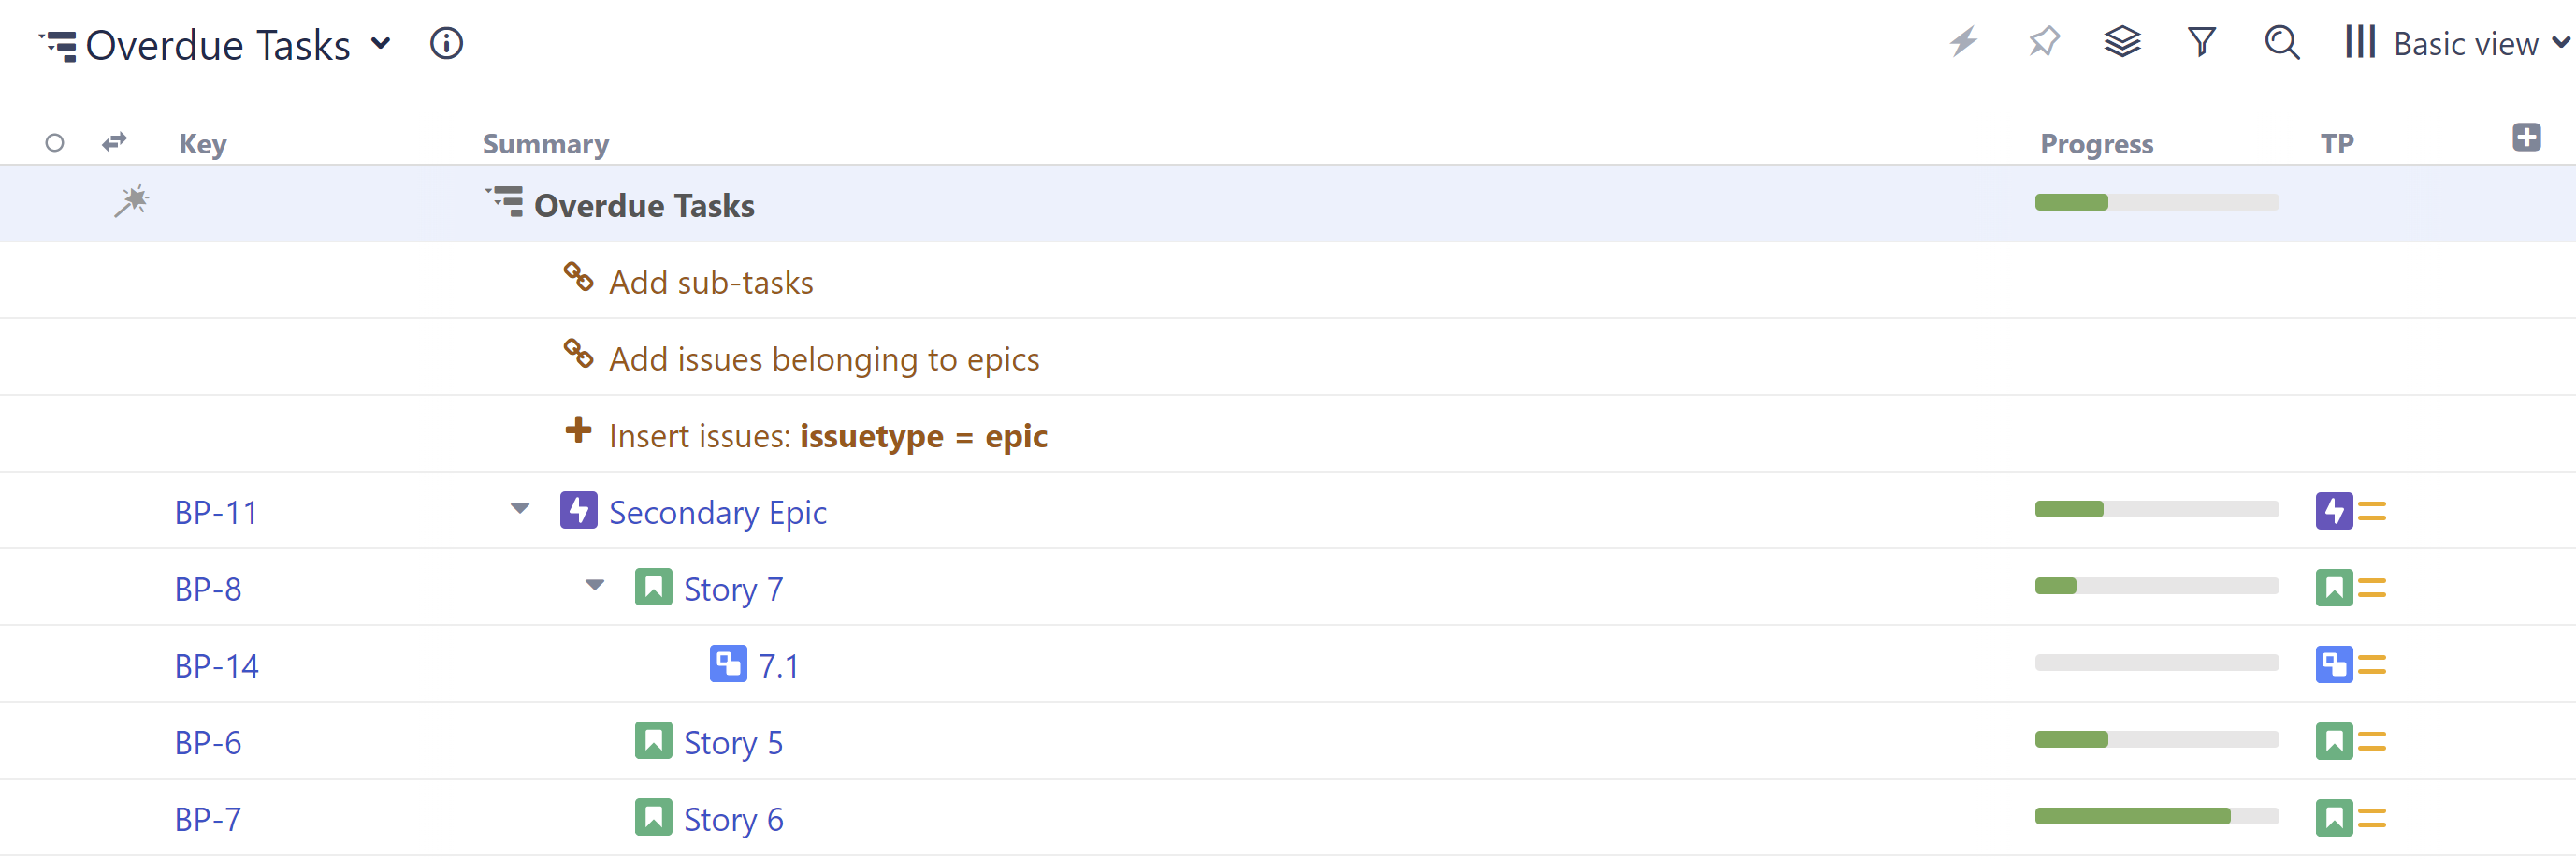
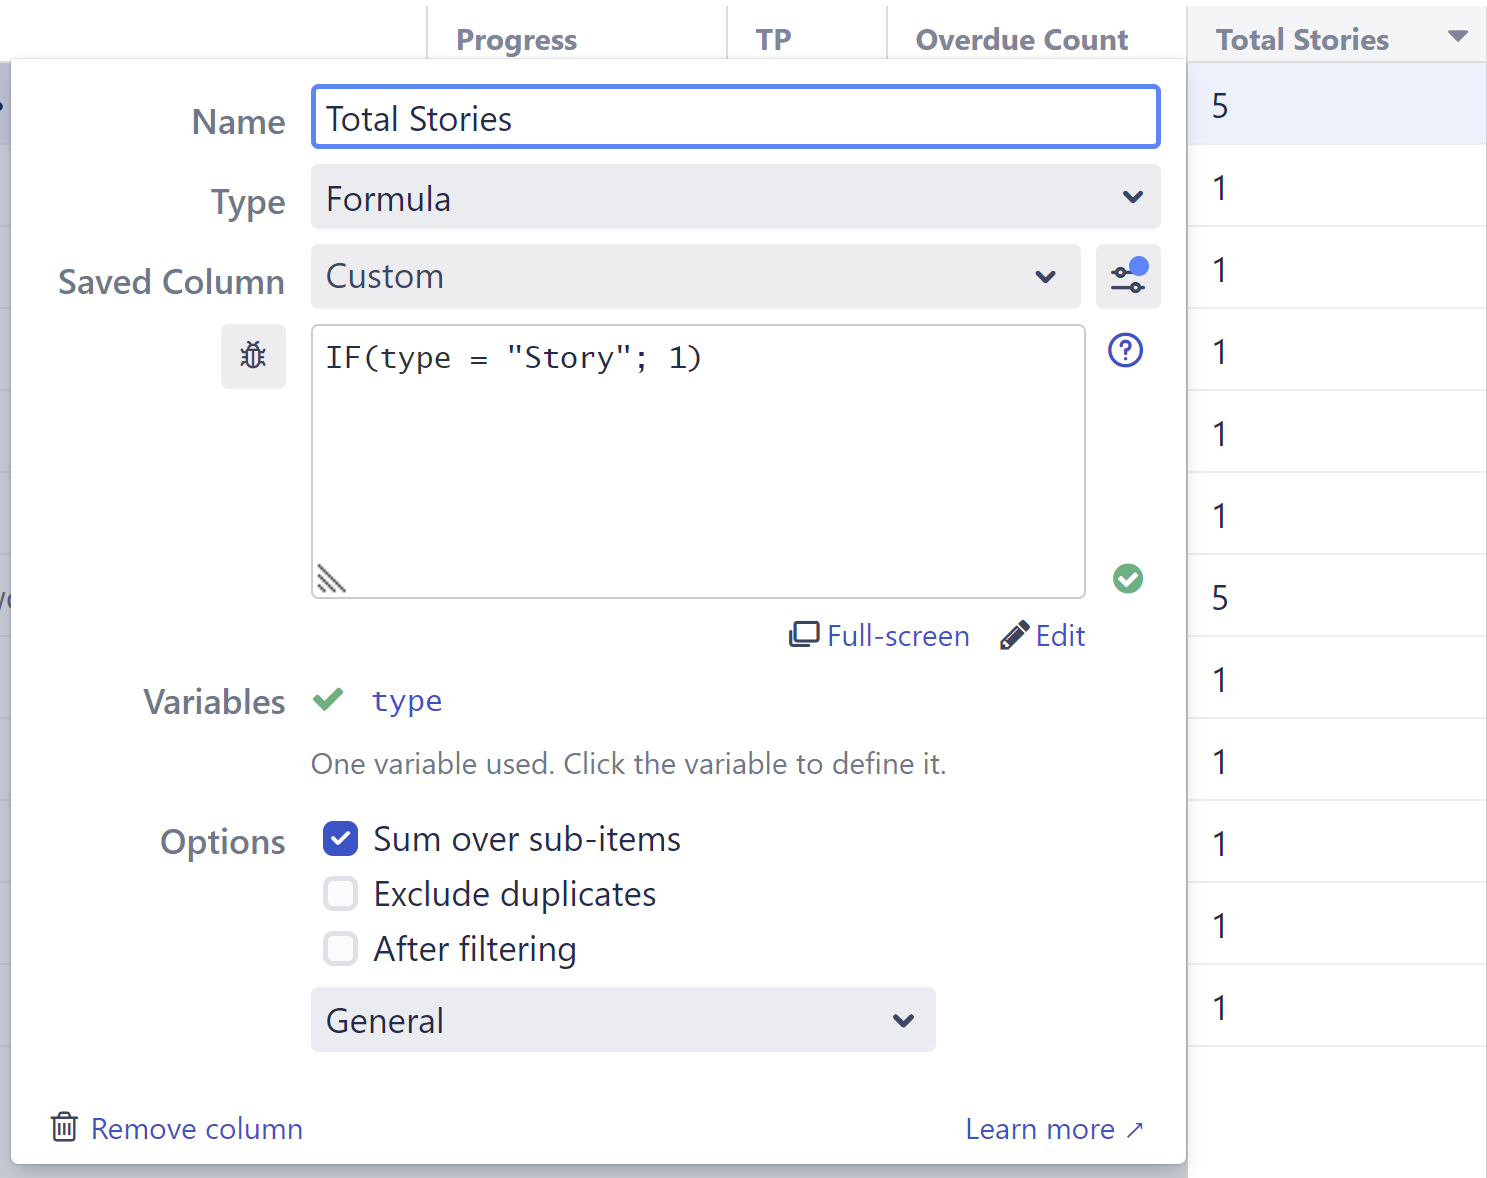
Track Overdue Tasks
[data-colorid=xcnp1as79b]{color:#333333} html[data-color-mode=dark] [data-colorid=xcnp1as79b]{color:#cccccc}[data-colorid=mxyk6ik7ca]{color:#333333} html[data-color-mode=dark] [data-colorid=mxyk6ik7ca]{color:#cccccc}[data-colorid=k4mrsrqsrn]{color:#333333} html[data-color-mode=dark] [data-colorid=k4mrsrqsrn]{color:#cccccc}[data-colorid=qrwszdg7bp]{color:#333333} html[data-color-mode=dark] [data-colorid=qrwszdg7bp]{color:#cccccc}[data-colorid=dq1ocj2qg2]{color:#333333} html[data-color-mode=dark] [data-colorid=dq1ocj2qg2]{color:#cccccc}[data-colorid=saryycno8p]{color:#333333} html[data-color-mode=dark] [data-colorid=saryycno8p]{color:#cccccc}[data-colorid=j9gzalgdgu]{color:#333333} html[data-color-mode=dark] [data-colorid=j9gzalgdgu]{color:#cccccc}[data-colorid=uzqsq36i2e]{color:#333333} html[data-color-mode=dark] [data-colorid=uzqsq36i2e]{color:#cccccc}[data-colorid=two4wdmzh2]{color:#333333} html[data-color-mode=dark] [data-colorid=two4wdmzh2]{color:#cccccc}[data-colorid=kt0p0h2y0y]{color:#333333} html[data-color-mode=dark] [data-colorid=kt0p0h2y0y]{color:#cccccc}[data-colorid=syu65agbfu]{color:#333333} html[data-color-mode=dark] [data-colorid=syu65agbfu]{color:#cccccc}[data-colorid=na88wopree]{color:#333333} html[data-color-mode=dark] [data-colorid=na88wopree]{color:#cccccc}[data-colorid=wkvo63u7us]{color:#333333} html[data-color-mode=dark] [data-colorid=wkvo63u7us]{color:#cccccc}[data-colorid=qwd9veskzv]{color:#333333} html[data-color-mode=dark] [data-colorid=qwd9veskzv]{color:#cccccc}[data-colorid=vf7bpg0zp6]{color:#333333} html[data-color-mode=dark] [data-colorid=vf7bpg0zp6]{color:#cccccc}Use Structure to identify:Overdue tasksNumber of overdue tasks per epic, initiative, or other larger groupingRatio of overdue tasks to total tasks for each epic, initiative, or other large groupingStep 1: Build Your StructureIn this guide, we're going to show you how to track overdue tasks at the epic level. To track overdue tasks for initiatives or any other large groupings, simply reconfigure the structure hierarchy - this can be done using different Insert, Extend, and Group generators.To create a new structure:Go to the Jira menu and select Structure | Create StructureAdd epics: Automation | Insert | JQL Query and enter the following JQL query: issuetype = EpicTo limit the epics to specific projects or other variables, add additional specifications (Example: AND project = "My Epics")Add stories: Automation | Extend | Stories under Epics...Add sub-tasks (optional): Automation | Extend | Sub-tasks...